
VLCWarper for Windows and Mac
VLC media player can now:
• warp fisheye movies "on the fly" for spherical mirror systems
• offset fisheye movies "on the fly" for truncated lens systems
Finally, dome theaters with spherical mirror systems are no longer limited to running movies on the Mac platform! And theaters with truncated fisheye lens projectors are no longer limited to running movies using their system's proprietary player.
 In 2013, Paul Bourke, developer of the meshmap/spherical mirror projection technique, incorporated this capability into the popular, open source cross-platform media player VLC. We're calling his modded app VLCWarper.
VLC's world-wide popularity is due in part to its ability to play almost any movie format you can throw at it — MPG, MOV, WMV, M2V, MP4, and lots more. It's been our experience that VLC handles some movies even better than their native applications. Naturally, you get all that versatility, since VLCWarper is VLC, with the capability of meshmap warping added in.
NOTE: VLCWarper does not use VLC's plug-in architecture. Its warping capability is "hard-wired" into the source code of VLC itself, and more specifically, only this particular VLC release (2.1.1, code-named Rincewind, released November 2013). Now more than ten years old, this version of VLC has difficulty playing modern 4K fisheye movies; 2k movies should play fine. After installation, users should ensure that VLC itself, the computer's operating system, and all update utilities are set to NOT automatically update VLC, or else future releases may overwrite this warp-capable version.
Truncated fisheye support
 Fisheye lens projectors with truncated displays, such as those from The Elumenati, don't need mirror warping. Instead, they need to keep the shape of the circle intact, and offset the center so it cuts off the top. The diameter fills the display when fullscreen, and doesn't squash the full circle into the vertical height.
VLCWarper can do this. You just need a meshmap with the appropriate aspect ratio for your system. We provide 4:3, 16:9 and 16:10 meshmaps for this purpose.
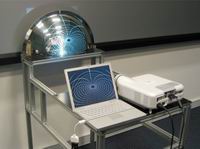
Typical Theater Use
Most single-channel fulldome setups feature a laptop or desktop computer/monitor and a video projector. The displays on the two are often mirrored; the projector on the secondary monitor channel simply shows the same thing as the computer's primary monitor. Movies are played fullscreen. VLCWarper can operate this way. (Actually, for Macs, it pretty much has to — see Caveats below.)
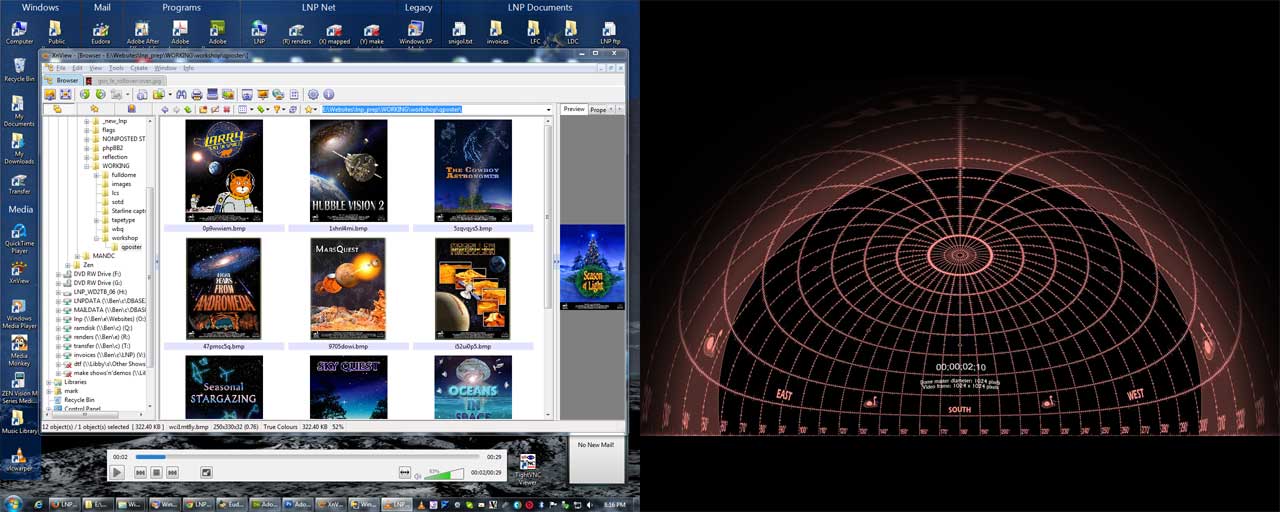 But we expect most Windows users will want to run VLCWarper in dual-monitor mode in their theaters. That's how we use it in our dome. VLCWarper plays fullscreen on the secondary monitor/projector, but on the primary monitor, we drag VLC's playback control bar, and see a conventional desktop otherwise. We can play/pause/scrub the movie, adjust the audio volume, etc. And we can call up Windows Explorer to cue up movies, trailers, whatever from the console... all while the projector is showing the movie to the theater. No more computer desktop splashing on the dome; the audience should never need to see it!
Available for download
As a Zip file, VLCWarper is about 40MB in file size, a bit too big to send as an email attachment. When we process your order, we send you an email with a link to download the Windows or Mac version, along with a test movie and some standard meshmap files for common spherical mirror setups and truncated displays.
Sorry, there is no demo or trial version. If you're unsure about VLC, try installing an unmodified copy of version 2.1.1 from VideoLAN to see if it plays your fisheye movies satisfactorily on your computer. If it does, VLCWarper will too; it simply warps VLC's video output, according to the assigned meshmap.
Details
VLCWarper requires a meshmap file with data about your system's warping or offset configuration.
If you have a spherical mirror system, you probably already have a meshmap. You simply point to its location in VLCWarper's Preferences module.
If you don't: After you purchase VLCWarper and download the Zip file using the link we send in email, you'll find standard meshmaps for both truncated and warped displays, in 16:9, 16:10, and 4:3 aspect ratios (including those for ePlanetarium spherical mirror Newtonian systems) there for download too.
Your needs will probably be met by one of those meshmap files.
You can also customize the default maps (they're just ASCII text) or create your own, using Paul Bourke's Mac OS-X utility meshmapper. (We don't provide this; follow the link to contact Paul Bourke.)
 YouTube players
TRUNCATED FISHEYE MOVIE

YouTube player loading...
A full-circle fisheye movie will look like this with a truncated-circle 4:3 aspect ratio meshmap.
SPHERICAL MIRROR WARPED MOVIE
YouTube player loading...
A full-circle fisheye movie will look like this with a spherical-mirror 16:9 aspect ratio meshmap.
VLCWarper is not a VLC plug-in
VLCWarper does not use VLC's plug-in architecture. Its warping capability is hard-wired into the source code of VLC itself, and more specifically, only this particular VLC release (2.1.1, code-named Rincewind). This means users should ensure that VLC itself, the computer's operating system, and all update utilities are set to NOT automatically update VLC, or else future releases may overwrite the warp-capable version.
QuickTime MOVs with embedded 5.1 audio
This has been a bug in VLC for years, and is still there. When playing QuickTime MOVs with 6 discrete audio channels embedded for surround sound, VLC mis-assigns the speaker outputs: Center channel comes out Left Surround, Right Surround goes to the subwoofer, etc. If you're only playing MOVs with stereo audio, you should be fine.
VLCWarper and VLC on the same computer
If you already have another version of VLC installed, you will encounter issues that will require some working around.
One problem stems from the fact both VLC and VLCWarper share the same .INI file, stored in the user's personal AppData folder location. This .INI file gets overwritten each time either program is run (to save Most Recently Played history, window sizes and positions, etc.), so settings you made for VLCWarper can get lost by running standalone VLC, and vice versa. You can prevent this from happening by saving your preferences for each version to a uniquely-named INI file, then launching each application from a customized shortcut or command line, appending the parameter --config=<configurationfilename> to specify which INI file to load and save to. But that's a pain. And, when selecting a movie from Explorer, that parameter will probably not get applied by VLC when it starts up, unless you create some batch files that contain the full command line, then associate a movie file extension with the batch file instead. But that would prevent you from opening the movie from Explorer with the other version of VLC, unless you right-clicked on the name and selected "Open with..." and that's even more of a pain.
For typical theater usage, we recommend having only one instance of VLC installed, and that one being VLCWarper.
Mac-specific
The Mac version of VLC does not offer the same set of user-selectable preferences as the PC version, and the way it operates on the Mac platform pretty much rules out using the rather elegant dual-monitor setup we described for Windows users above. You can still use VLCWarper, but it will work best with monitor and projector displayed mirrored.
Specifically, on our iMac, running Lion 10.7.5,
• when we dragged the VLCWarper window from the iMac screen to the projector display and hit Fullscreen, our primary monitor went black. So much for calling up the next movie in Finder.
• The controller bar could be dragged to the primary monitor, but its position isn't remembered. Apparently, you have to drag it off the projector screen to the primary monitor each and every time.
• The Mac version of VLC does not offer the option to pause the movie on the last frame. So when the movie runs out, VLCWarper's window collapses, and the audience is blasted with the desktop display over the whole dome. This was one of our biggest annoyances with WarpPlayer. And it's still there, on the Mac anyway.
Crashing on Mojave

We've heard reports that VLCWarper crashes on some Macs running Mojave. The problem seems to be fixed by enabling the program as an exception under the Accessibility options for the Security & Privacy part of the System Preferences.
Here's how:
1. Open "System Preferences" from the Apple menu, top left.
2. Select "Security & Privacy".
3. Select the "Privacy" tab, top right.
4. Select "Accessibility" in the left column.
If needed, unlock the padlock at the bottom to enable changes.
5. Scroll down the list of apps in the right column, and enable the checkbox next to VLC.app.
If it isn't already there, add VLC app with the "+".
For Windows XP SP2 or later...
After you purchase VLCWarper, download the Zip file using the link we send by email, and extract all files/folders in the Zip archive into a new folder on your computer — we suggest naming it VLCWarper. (We'll assume you know how to deal with Zip files!)
Once unzipped, locate and run the file called vlcwarper.exe.
WARNING: If you have another version of VLC installed already, see the Caveats section for a description of problems that may occur.
Select pix to enlarge
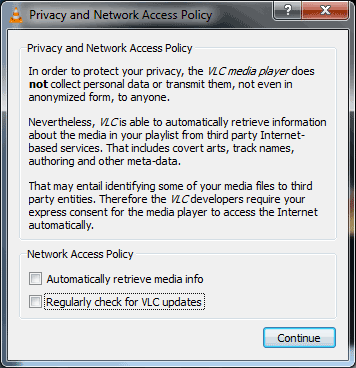 1) The first time you run the program, you may or may not see VLC display a dialog for their Privacy and Network Access Policy.
If you do, we recommend unchecking both boxes. You will not want VLC to update itself, because future releases from Videolan.org will obviously not have warping capability built in; and you will not need to automatically retrieve media info from the Internet for the movies you have installed on your system
Then choose Continue. (You can also uncheck the boxes later, in VLC's Preferences).
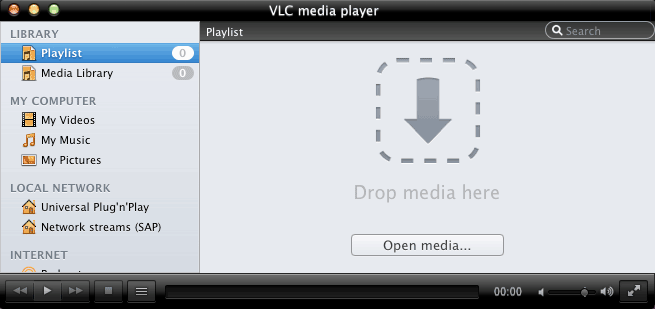
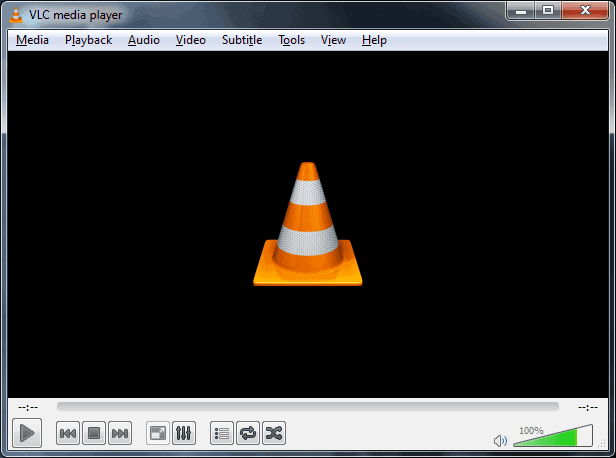 2) You'll then see the default VLC media player screen.
Let's test to see how VLC plays fisheye movies without warping first. You can use our standard alignment grid for testing purposes, a 1024px fisheye movie named LNP_grid.mpg. Extract it from the LNP_grid_1024.zip file (it's at the same download link location as the purchased program file) to your computer. From there, drag it onto the player window. If the movie plays video and audio smoothly, great. (It won't warp yet; again, this is just a test.)
If it doesn't, that's a problem you'll need to tackle before continuing.
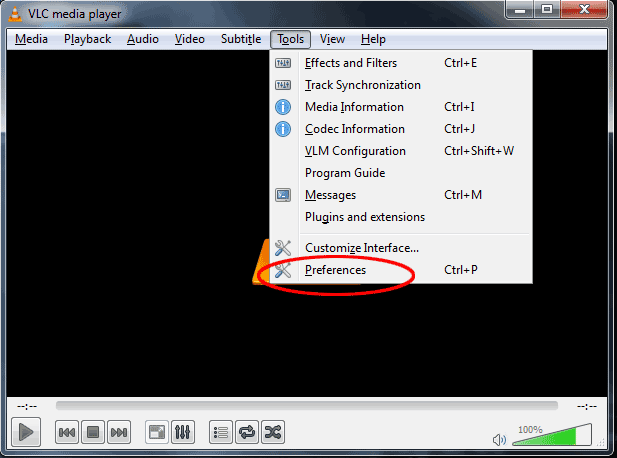 3) From VLC's menu bar, select Tools->Preferences.
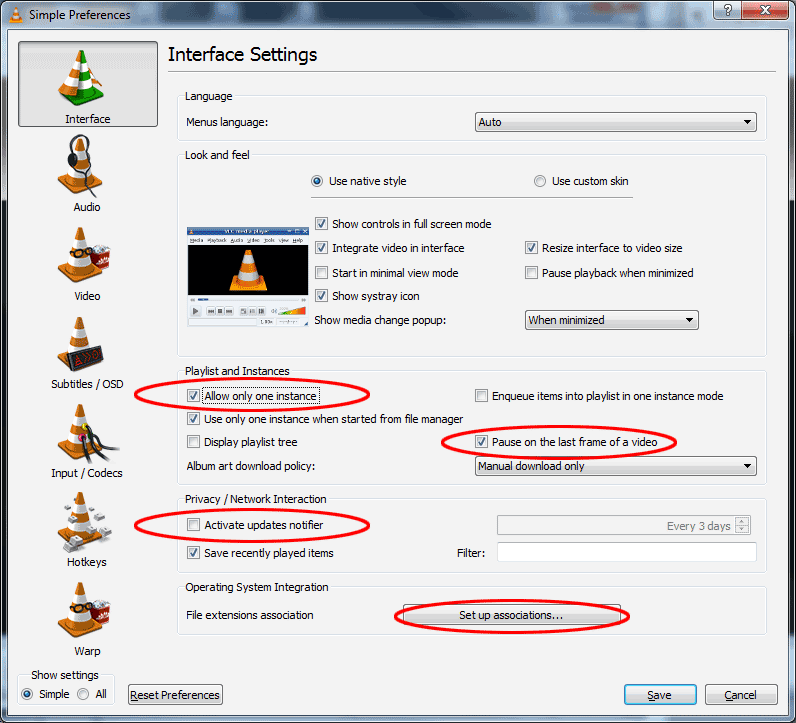 4) The first screen you'll see is Interface Settings.
Under Playlists and Instances, we recommend checking "Allow only one instance". In theater situations, you won't be playing two movies at the same time fullscreen on your projector.
We also recommend checking "Pause on the last frame of a video". In theater situations, when the movie is finished and fades to black, you'll probably want to keep the black frame on the dome; you don't want VLC to automatically close the player window, leaving the computer's desktop screen to blast out to the audience.
Under Privacy / Network Interaction, be sure "Activate updates notifier" is not checked. Since you won't want to be updating this warp-capable copy of VLC, you don't need the program to bug you every 3 days to do so.
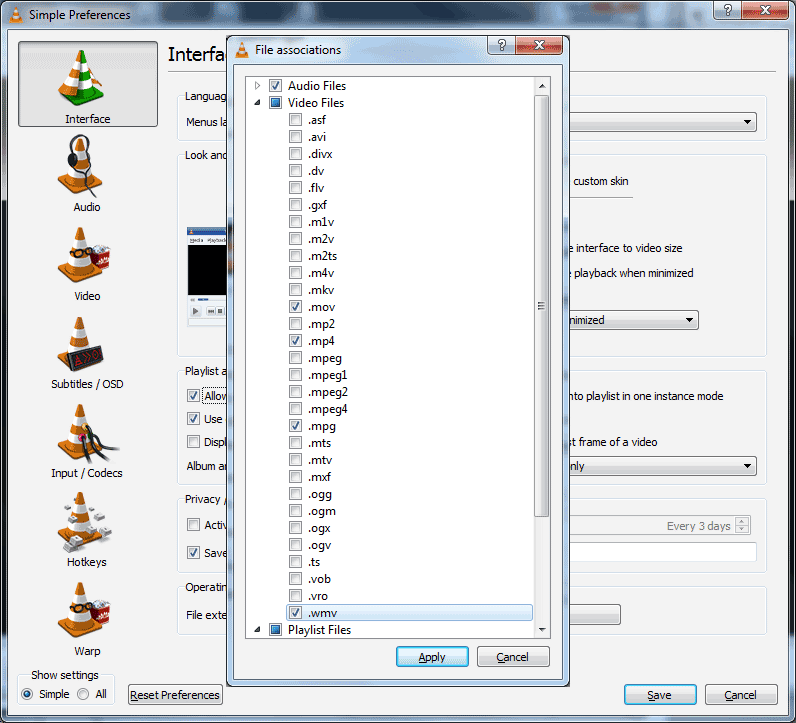 5) Choose the "Set up associations..." bar, and check the file extensions for the movies you'll be playing. This should allow you to simply select them in Explorer and VLCWarper will open and play them automatically. Select "Apply" when finished.
NOTE: That is how it is supposed to work. For us, it did not — the boxes were checked, but the associations were NOT applied. We had to use Explorer, right-click on the movie, select "Open with..." and manually select VLCWarper (which may appear as "VLC media player 2.1.1"), and check the box for "Always use the selected program to open this kind of file" in the dialog. Your mileage may vary.
 6) Next, select the Video icon in the left column to see the Video Settings dialog. Normally, you will playback your movies fullscreen, and here is one place where you check the "Fullscreen" box. However, you may want to hold off on checking that box until we've got the rest of the Dual-Monitor Theater Setup finished below.
==>> This is important! VLCWarper does all its warping using OpenGL, and you need to force VLC to use it. In the Output dropdown bar, we'll change it from its default "Automatic" by selecting "OpenGL video output".
 7) Next, select the Subtitles / OSD icon. Under On Screen Display, uncheck the box "Show media title on video start" -- unless you really want to have the audience see something like LTD_show_1408_US.mpg front-and-center on the horizon of your dome when you start playing your movie.
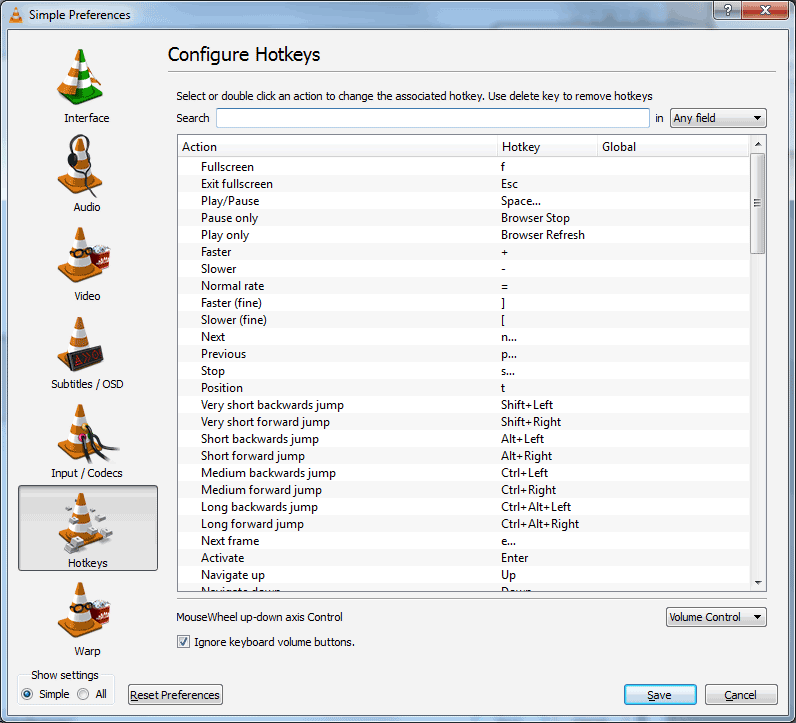 8) Next, select the Hotkeys icon. We won't set any now, but note the hotkey for Fullscreen is, logically: f (it's a toggle). Scroll the list to see which others may be useful to commit to memory — like the hotkey to quit the program: Ctrl-q.
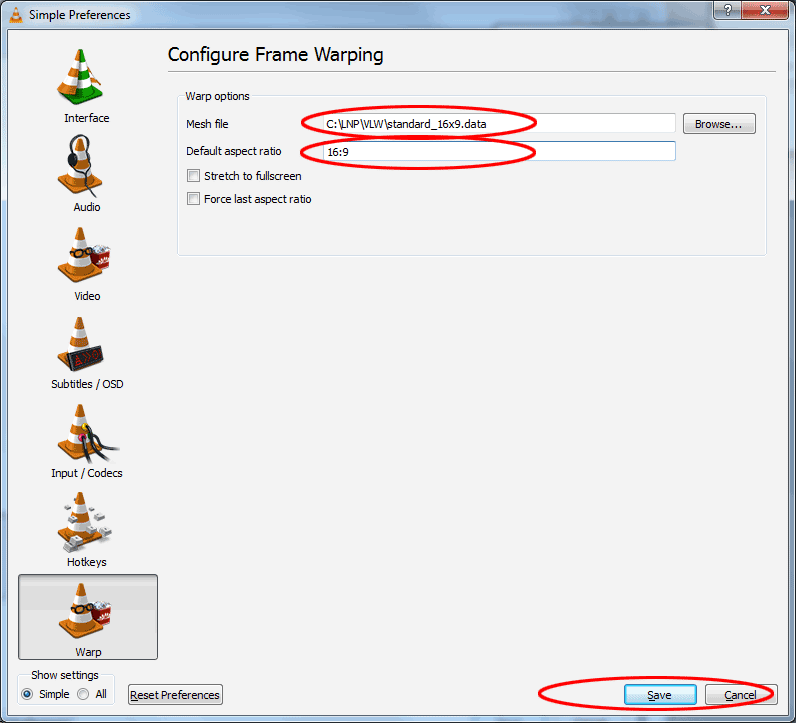 9) Finally, select the Warp icon. Here's where you Configure Frame Warping, the module that turns plain vanilla VLC into VLCWarper. For "Mesh file", browse to the location of your meshmap and select it. In the "Default aspect ratio" box, enter "16:9" (or whatever you're using). This will ensure your movie plays back with the correct x/y dimensions, necessary if that information isn't included in the header of the movie file format.
Finish up by selecting "Save", so VLCWarper will remember all your configuration settings.
Close VLCWarper. <<== This is important!
Now try clicking on our test fisheye movie in Explorer. If all went well, VLCWarper should open and start playing the movie, warped.
If you're going to be running your monitor displays in mirrored mode (same thing on both), you can go back into Preferences and set VLCWarper to start in Fullscreen mode at this point. Otherwise, continue on to the Dual-monitor Theater Setup section below.
The concept here is that you, the theater operator, will be at the computer, and will use Windows Explorer to choose the movies you want to play. The file's extension — MPG, MOV, MP4, etc. — should be associated to open with VLCWarper as a default, so just by selecting the movie's title in Explorer, VLCWarper will open and play the movie in fullscreen on the secondary monitor/projector channel. The playback controller bar will appear on your primary monitor, so you'll be able to play/pause, restart/scrub the movie, adjust the volume, like that.
Once set up, VLC should remember the positions of its windows for playback and controller bar, and use them for subsequent sessions.
TIP: When setting up for the first time, we recommend using two desktop monitors to configure the primary and secondary screens. Once you get things working that way, you can just swap the secondary monitor for your projector. Or, if you have a Newtonian-style setup, you can remove the secondary flat mirror, and aim the projector at a nearby wall or something. Bouncing a standard desktop display off a spherical mirror and then trying to cursor around to select menu items can be a pain, as you have probably discovered.
To begin, you'll need to set your computer's video card for multiple displays (if it isn't already), and your desktop to "Extend" over both primary and secondary monitors. There are various ways to do this, depending on your operating system and video cards. The chances are you already know how; if not, it may be helpful to refer to your owner's manual, if you can find it.
Assuming you went through the configuration above, select our LNP_grid.mpg test movie in Explorer. It should start playing in VLCWarper's window on your primary monitor.
VLC's hotkey for toggling fullscreen mode is, appropriately, f. With the VLCWarper window active, press f a few times to toggle the display into fullscreen and back to windowed mode. Working? Good.
In windowed mode, drag the VLCWarper window over to the secondary monitor. Its exact position isn't critical, just so it's completely off the primary monitor.
VLC's playback controls appear along the bottom of the window in windowed mode. In fullscreen mode, you'll notice VLC's controller bar appears for a moment at the bottom of the screen, then fades out. It reappears whenever you move your cursor over that area at the bottom of the screen.
What we want is the controller bar always to appear on the primary monitor; you don't want your audiences to see it on the dome of course. So with the movie playing fullscreen and the cursor over where the controller bar appears, simply click on a blank area of the controller bar and drag it over to the primary monitor.
Move the cursor back to the VLCWarper window, and toggle f a few times. In fullscreen mode each time, the controller bar should now appear where you put it on the primary monitor.
But we don't want it constantly fading out; it needs to remain visible all the time to be useful. Let's fix that.
Select pic to enlarge
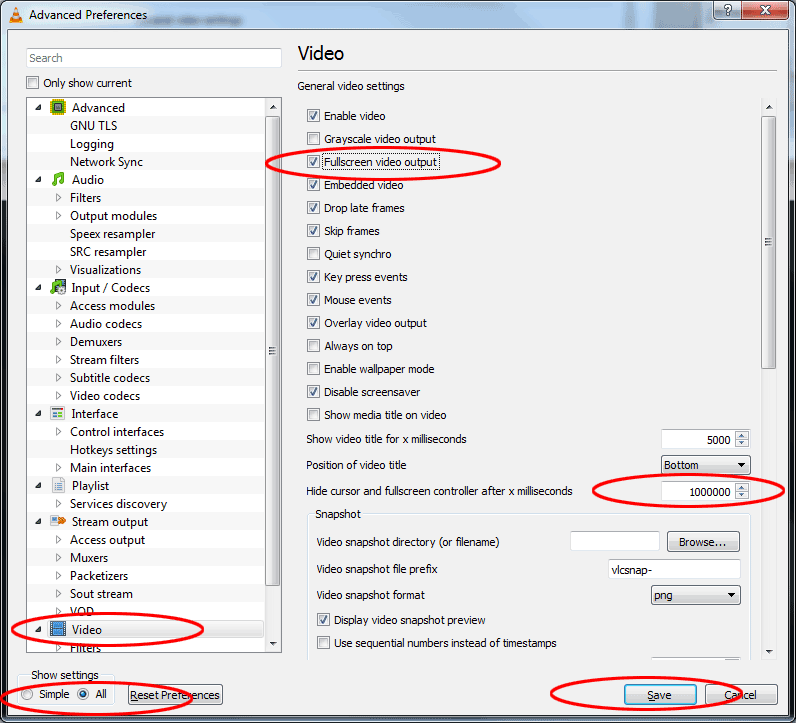 Press f until VLCWarper is in windowed mode, so you can get to the menu bar. Select Tools->Preferences, and in the lower left corner for "Show settings", select "All". In the left column, select "Video".
On the right side, there's a field labeled "Hide cursor and fullscreen controller after x milliseconds", and a default of 1000. If you add a few zeroes to change it to 1000000, then the controller bar will stay on practically "forever".
While we're here, let's set VLCWarper to always start movies in fullscreen mode, to save wear and tear on your f key. Check the box "Fullscreen video output". Hit "Save" to keep these settings.
That should do it. Close VLCWarper, and select another movie in Explorer as a test. It should start playing fullscreen on the secondary monitor (where your projector is connected), while you have the controls on your primary monitor.
But wait, where's the controller bar? Well, currently there is one minor annoyance with this arrangement. Above, we set the controller bar to not hide for a long time. But in conventional VLC operation, they must have assumed your cursor would actually be in the window to operate those controls. If that never happens, the controller bar never appears initially. So the workaround is to simply move the cursor briefly into the secondary monitor screen once, then back again. That will cause the bar to appear on your primary monitor where you left it; once it's on, it should stay on as you've set. If you target the top left corner of the secondary monitor for your initial cursor move, it shouldn't appear in the active screen area, so the audience won't see it. You'll probably get into the habit soon enough.
For Mac OS-X: 10.6 or later...
After you purchase VLCWarper, download the Zip file using the link we send by email. Put it on your desktop, and open it (using the default Archive Utility) to extract all the files. This will create an icon on the desktop, called VLC.app — we suggest renaming it VLCWarper.app. (We'll assume you know how to deal with Zip files!)
WARNING: If you have another version of VLC installed already, see the Caveats section for a description of problems that may occur.
Select pix to enlarge
 1) Select VLC's traffic cone icon. You should get the default VLC media player screen.
Let's test to see how VLC plays fisheye movies without warping first. You can use our standard alignment grid for testing purposes, a 1024px fisheye movie named LNP_grid.mpg. Extract it from the LNP_grid_1024.zip file (it's at the same download location as the purchased program file) to your computer. From there, drag it onto the player window. If the movie plays video and audio smoothly, great. (It won't warp yet; again, this is just a test.)
If it doesn't, that's a problem you'll need to tackle before continuing.
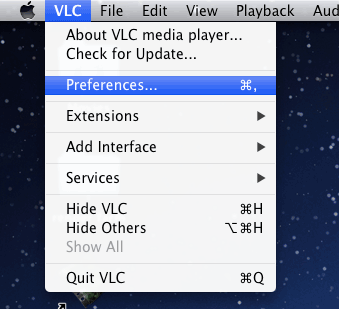 2) From VLC's menu bar, select Preferences.
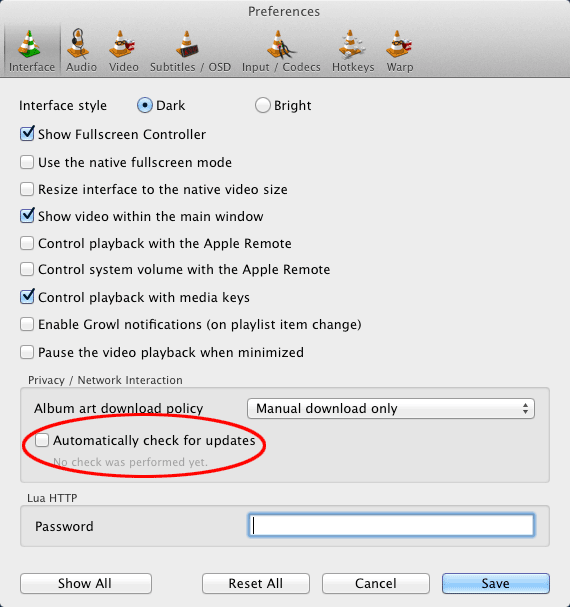 3) With the Interfaces icon selected at top left, under Privacy / Network Interaction, be sure "Automatically check for updates " is unchecked, since you won't want to be updating this warp-capable copy of VLC.
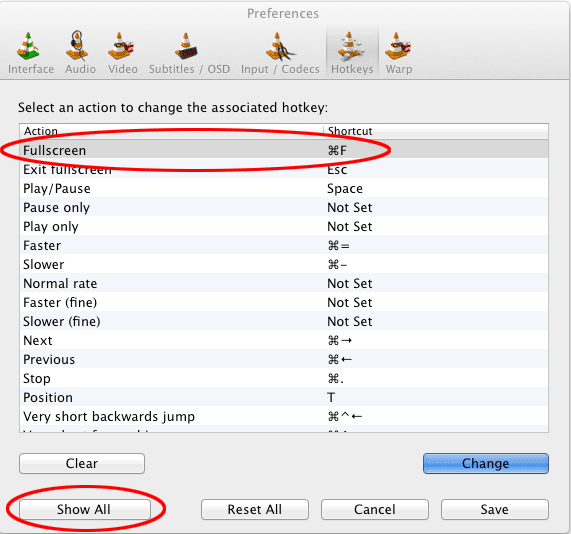 4) Next, select the Hotkeys icon. We won't set any now, but note the hotkey for Fullscreen is, logically: Command-f. Scroll the list to see which others may be useful to commit to memory — like the hotkey to quit the program: Command-q.
Next, the select "Show All" bottom left.
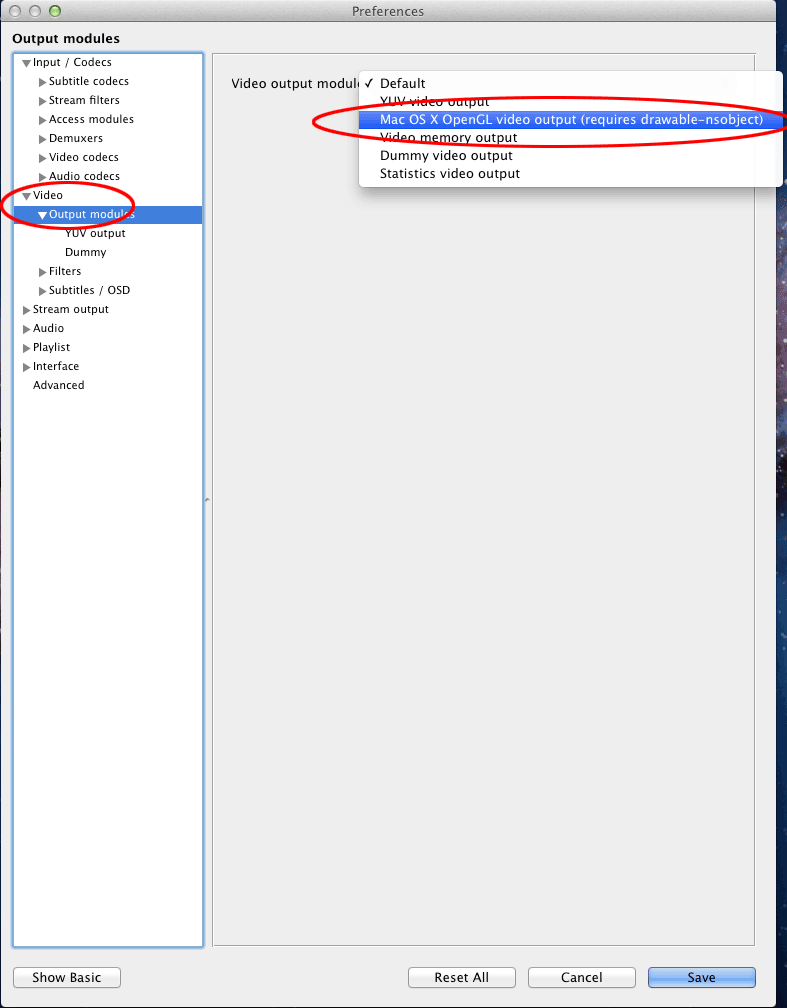 5) Select "Video" and "Output modules" in the left column.
VLCWarper does all its warping using OpenGL, and you need to force VLC to use it. In the Video output module dropdown bar, we'll change it from its default "Automatic" by selecting "Mac OS X OpenGL video output".
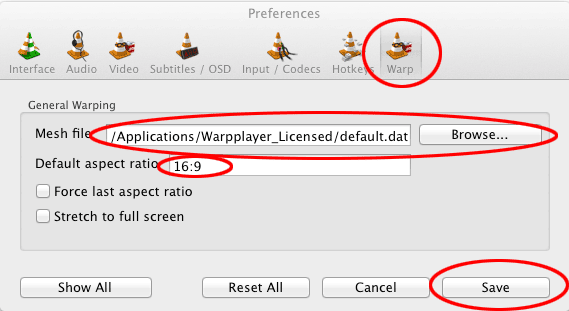 6) Finally, select the Warp icon on the top right. Here's where you configure General Warping, in the module that turns plain vanilla VLC into VLCWarper. For "Mesh file", browse to the location of your meshmap and select it. In the "Default aspect ratio" box, enter "16:9" (or whatever you're using). This will ensure your movie plays back with the correct x/y dimensions, necessary if that information isn't included in the header of the movie file format. Finish up by selecting "Save", so VLCWarper will remember all your configuration settings.
Close VLCWarper. <<== This is important!
 7) We recommend you set up your Mac to associate the file extensions for the movies you'll be playing with VLCWarper. This should allow you to simply select them in Finder or wherever, and VLCWarper will open and play them automatically.
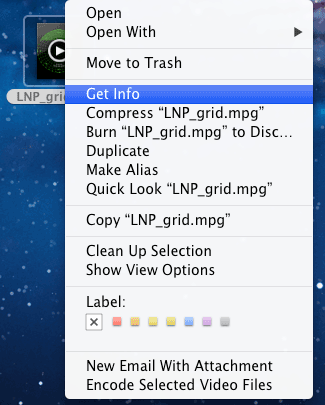
You do this by selecting a movie, then Control/Right-clicking on it and choosing "Get Info".
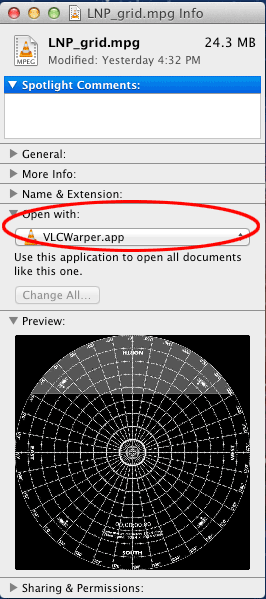 8) In the next dialog, select "Open with:" and choose VLCWarper.app.
Repeat this for all the movie types you'll be playing with VLCWarper.
Now try clicking on our test fisheye movie in Finder. If all went well, VLCWarper should open and start playing the movie, warped.
If you're going to be running your monitor displays in mirrored mode (same thing on both), you can go back into Preferences and set VLCWarper to start in Fullscreen mode at this point. Otherwise, continue on to the Dual-monitor Theater Setup section below.
The concept here is that you, the theater operator, will be at the computer, and will use Finder to choose the movies you want to play. The file's extension — MPG, MOV, MP4, etc. — should be associated to open with VLCWarper as a default, so just by selecting the movie's title in Finder, VLCWarper will open and play the movie in fullscreen on the secondary monitor/projector channel. The playback controller bar will appear on your primary monitor, so you'll be able to play/pause, restart/scrub the movie, adjust the volume, like that.
Once set up, VLC should remember the positions of its windows for playback and controller bar, and use them for subsequent sessions. (At least it does in the Windows version; the Mac version... well, test results are inconsistent.)
TIP: When setting up for the first time, we recommend using two desktop monitors to configure the primary and secondary screens. Once you get things working that way, you can just swap the secondary monitor for your projector. Or, if you have a Newtonian-style setup, you can remove the secondary flat mirror, and aim the projector at a nearby wall or something. Bouncing a standard desktop display off a spherical mirror and then trying to cursor around to select menu items can be a pain, as you have probably discovered.
To begin, you'll need to set your computer's video card for multiple displays (if it isn't already).There are various ways to do this, depending on your operating system and video cards. You probably already know how.
Select pix to enlarge
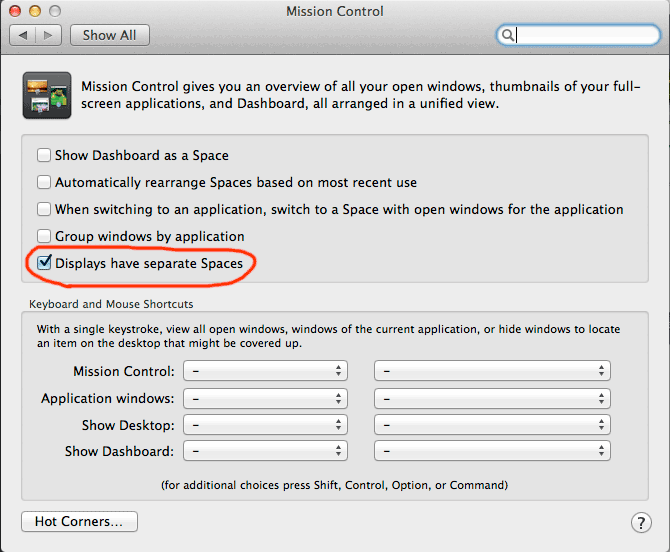 In your Mac's Mission Control app, select the checkbox for "Displays have separate Spaces". This should allow you to have VLCWarper fullscreen on the secondary monitor, and not black out the Mac desktop on the primary monitor.
Note that Spaces is an invention that came after OS-X Lion, so older systems may not have this capability.
Assuming you went through the configuration above, go back into VLCWarper's Preferences, select the Video icon, and be sure "Always on top" and "Black screens in Fullscreen mode" are checked. Be sure to "Save" your changes.
Select our LNP_grid.mpg test movie. It should start playing in VLCWarper's window on your primary monitor.
VLC's hotkey for toggling fullscreen mode is, appropriately, Command-f. With the VLCWarper window active, press Command-f a few times to toggle the display into fullscreen and back to windowed mode. Working? Good.
In windowed mode, drag the VLCWarper window over to the secondary monitor. Its exact position isn't critical, just so it's completely off the primary monitor.
VLC's playback controls appear along the bottom of the window in windowed mode. In fullscreen mode, you'll notice VLC's controller bar appears for a moment at the bottom of the screen, then fades out. It reappears whenever you move your cursor over that area at the bottom of the screen.
What we want is the controller bar always to appear on the primary monitor; you don't want your audiences to see it on the dome of course. So with the movie playing fullscreen and the cursor over where the controller bar appears, simply click on a blank area of the controller bar and drag it over to the primary monitor.
Move the cursor back to the VLCWarper window, and toggle Command-f a few times. In fullscreen mode each time, the controller bar should now appear where you put it on the primary monitor.
But we don't want it constantly fading out; it needs to remain visible all the time to be useful. Let's fix that.
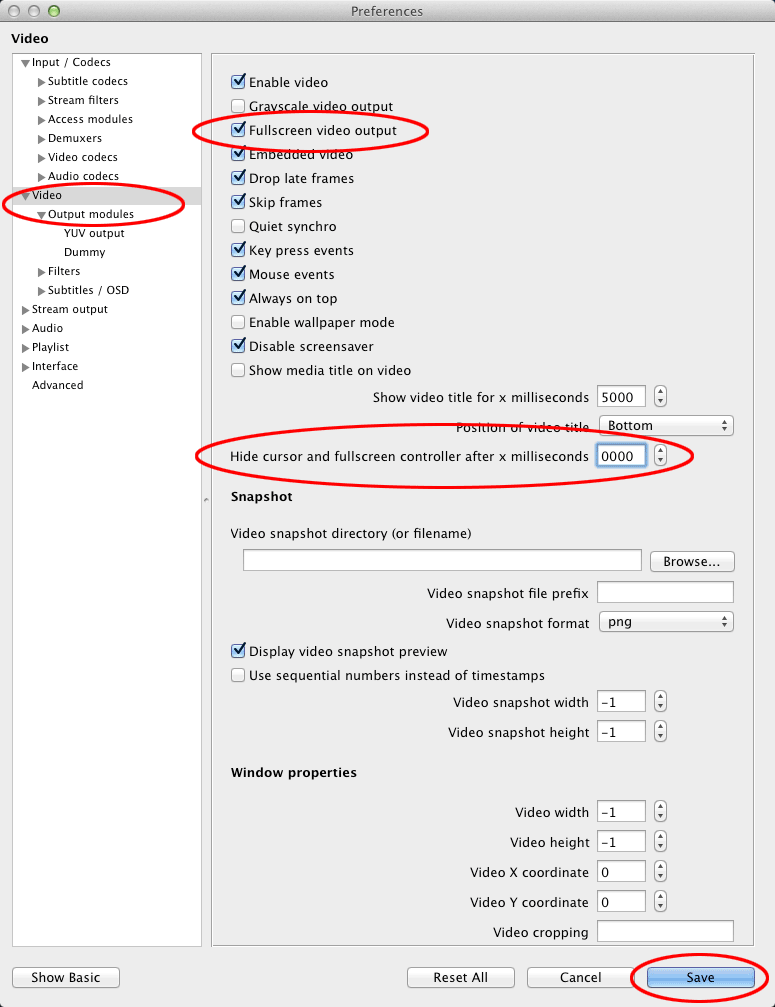 Press Command-f until VLCWarper is in windowed mode, so you can get to the menu bar. Select Preferences, and in the lower left corner select "Show All". In the left column, select "Video".
On the right side, there's a field labeled "Hide cursor and fullscreen controller after x milliseconds", and a default of 1000. If you add a few zeroes to change it to 1000000, then the controller bar will stay on practically "forever".
While we're here, let's set VLCWarper to always start movies in fullscreen mode, to save wear and tear on your f key. Check the box "Fullscreen video output". Hit "Save" to keep these settings.
That should do it. Close VLCWarper, and select another movie in Finder as a test. It should start playing fullscreen on the secondary monitor (where your projector is connected), while you have the controls on your primary monitor.
But wait, where's the controller bar? Well, currently there is one minor annoyance with this arrangement. Above, we set the controller bar to not hide for a long time. But in conventional VLC operation, they must have assumed your cursor would actually be in the window to operate those controls. If that never happens, the controller bar never appears initially. So the workaround is to simply move the cursor briefly into the secondary monitor screen once, then back again. That will cause the bar to appear on your primary monitor where you left it; once it's on, it should stay on as you've set. If you target the top left corner of the secondary monitor for your initial cursor move, it shouldn't appear in the active screen area, so the audience won't see it. You'll probably get into the habit soon enough.